
Organize your writing with this easy method
Many user experience writers (UX) and content strategists are familiar with design tools like Sketch, InVision, and Balsamiq. These are great resources for a team to share feedback on wireframes, mockups, and prototypes.
But what about the copy? How do you and your team decide on in-product copy to place in those wireframes, mockups, and prototypes? For many teams, the answer is something like, We copy and paste from an email or a Slack post. It’s scattershot, without a straightforward process. There’s no single place for copy iterations to live or get feedback, the way there is for design.
If this sounds familiar, your UX team could benefit from using copy docs. These are also known as copy decks, content templates, or copy platforms. A copy doc is a one-stop “source of truth” for all the copy in a project. There’s no single way to create or use one, but here are some basics to help you get started.
What is a copy doc?
Copy docs stem from the advertising world, where they’re typically called copy decks. A copy doc is a single document created in a word-processing tool like Microsoft Word, Dropbox Paper, or Google Docs. It holds all the copy for a single project: a landing page, a series of mobile screens, a set of onboarding emails, or anything else.
There are typically two main differences between old-school ad agency “decks” and new-school UX copy docs:
New-school copy docs include images (screenshots or mocks) and show copy recommendations within a visual context while traditional copy decks usually only included text.
Old-school copy docs were emailed back and forth, a cumbersome process. Now, copy docs are usually shared with tools like Dropbox Paper and Google Docs, so gathering feedback is faster and easier.
Example of a copy doc
Why should I use copy docs?
One home for all the copy
When all the copy for a project lives in one place, anyone on the project can easily see, review, and comment on it. A copy doc is also a historical document, where anyone can view the final copy, even after the project shipped. If you’ve ever shipped a project with poor copy, you know how important it is to easily review your process and see what could have improved.
Templates and consistency
Copy docs can become templates for future projects, and they can be priceless when you audit for voice, tone, and style. If your team doesn’t already have a style guide, you can review your older copy docs for consistency — or lack thereof.
Professionalism
If you’re a freelancer or in a big company where you juggle many stakeholders, copy docs can help you stay organized. Presenting your work the same way each time also helps underscore your professionalism. You streamline your process, and your projects gain more consistency, thoroughness, and accuracy.
When in the design process should I use a copy doc?
Every team’s process will be different, so you’ll have to play around with copy docs a bit to find out what works best for you. Some teams find it useful to write the copy before starting the design. Others create simple wireframes or a basic visual layout before starting the copy.
Whatever you discover, remember your copy docs will need to be flexible so they can evolve as your processes change. You might find you don’t need some elements, while other seemingly small details can make a huge impact. Taking time to find a structure that works well for you will help your team clarify the design process over time.
What tools do I need to create a copy doc?
Any word processing tool that lets you insert images is good: try Word, Dropbox Paper, or Google Docs. Some writers like to hash out copy explorations in a simple text editor before transferring them to a copy doc. A couple of popular text editors are Notepad++ and TextEdit.
Some writers insert copy directly into the design, using tools like Sketch or Illustrator, to see how it looks. Then they fill in a copy doc with the final copy. To organize large projects, you can try a project management tool like Basecamp or Asana. For example, you could assign a coworker to review your landing page copy. Storytelling tools like Scrivener can help you move copy around and reorganize your text in a modular way.
How to create a copy doc
Now that you’re clear on the what, why, and when to use copy docs, let’s get into how. Every writer will use a slightly different format, but the essential elements are:
Header and project information
Images (repeat as needed)
Copy table (repeat as needed)
Header and project information
Your header and project information provide guidance to anyone who might read your copy doc. For freelancers, it’s useful to reiterate your name and contact information on every version of a copy doc. It can also be a great chance to introduce your own branding and stand out as a pro.
Header
Project name
Your name (and contact information if you work externally)
Version (e.g., Template, First draft, Final draft) and current date
Critical information about the project
Audience
Goal and/or hypothesis
Links to relevant project documents, like design specs or prototypes
Voice, tone, and style guidelines for the project (optional)
The particular tone this project needs — playful, bold, warm, etc.
SEO keyword requirements
Common errors, such as product name punctuation or how to capitalize your CTAs
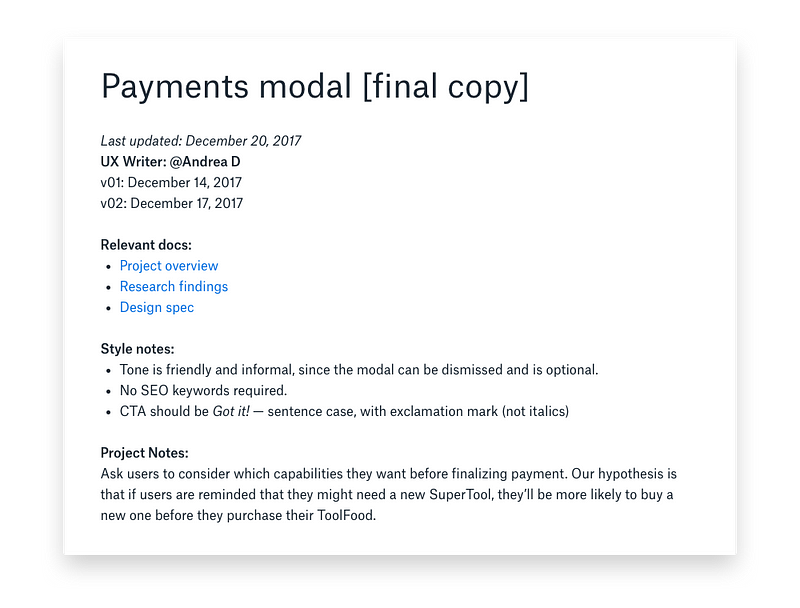
Example of title, header, and project information in a copy doc
Images
Images let you see the surface(s) to write for as you’re writing. They also provide context for other project members. You can see the whole user flow with its associated copy (see “Copy tables,” below), all in one spot.
In the body of your doc, insert images of the surface(s) you need to create copy for. These are often simple image files, like JPGs or PNGs. They can be wireframes, design mocks, or screenshots from a prototype. You can also use photographs: a hand-sketched project outline, a whiteboard session, or a spread of Post-It notes.
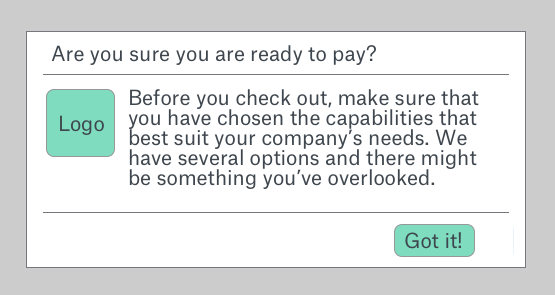
Example of an image that needs copy revisions
Copy tables
Your final copy and explorations will live in tables beneath each image. Again, you’ll need to play around to find a table format that works for you. One common format is to have a row for each copy element. Depending on your project, these elements could be:
Headline
Subhead
Body copy
CTA
Disclaimer
Or they could be something like:
Question 1
Form field placeholder copy
Question 2
Radio button 1
Radio button 2
Checkbox
Link copy
For an email, you might want:
Subject
Preheader
H1
H2
Body
Button CTA
Remember, the ideas listed here are just suggestions to start with. As you get used to working with copy docs, you’ll discover new ways to organize your copy tables that work best for you and your team.
The most important part is to be clear which element maps to which piece of copy. If you’re not sure whether the final design will include an element, mark it as “tentative” or similar. You want anyone who looks at this doc to know precisely which bit of copy should go where in the design.
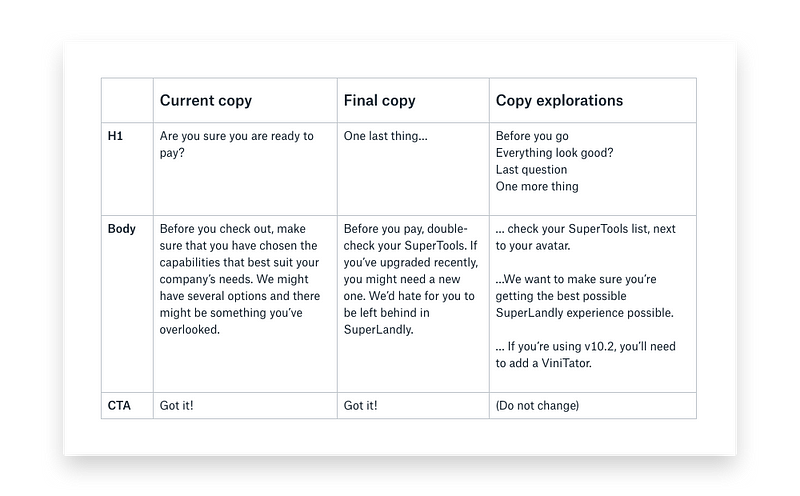
Example of a copy table
Your amazing words
In the column next to each element, fill in your brilliant copy. There are a few ways to do this, depending on your process. You can include the copy that’s already in the mock, if there is any. Title this Current copy.
If your team only needs final copy and isn’t interested in your copy explorations, you’ll only need one other column. You can title this Final copy.
If your team members like to see — and give input on — a variety of copy, you can add another column and title it Copy explorations. When your team has decided on the final, best words, you can move the winner to the “Final copy” column. That’s where anyone who needs to can copy-and-paste the correct, edited copy from — not from an email or Slack message.
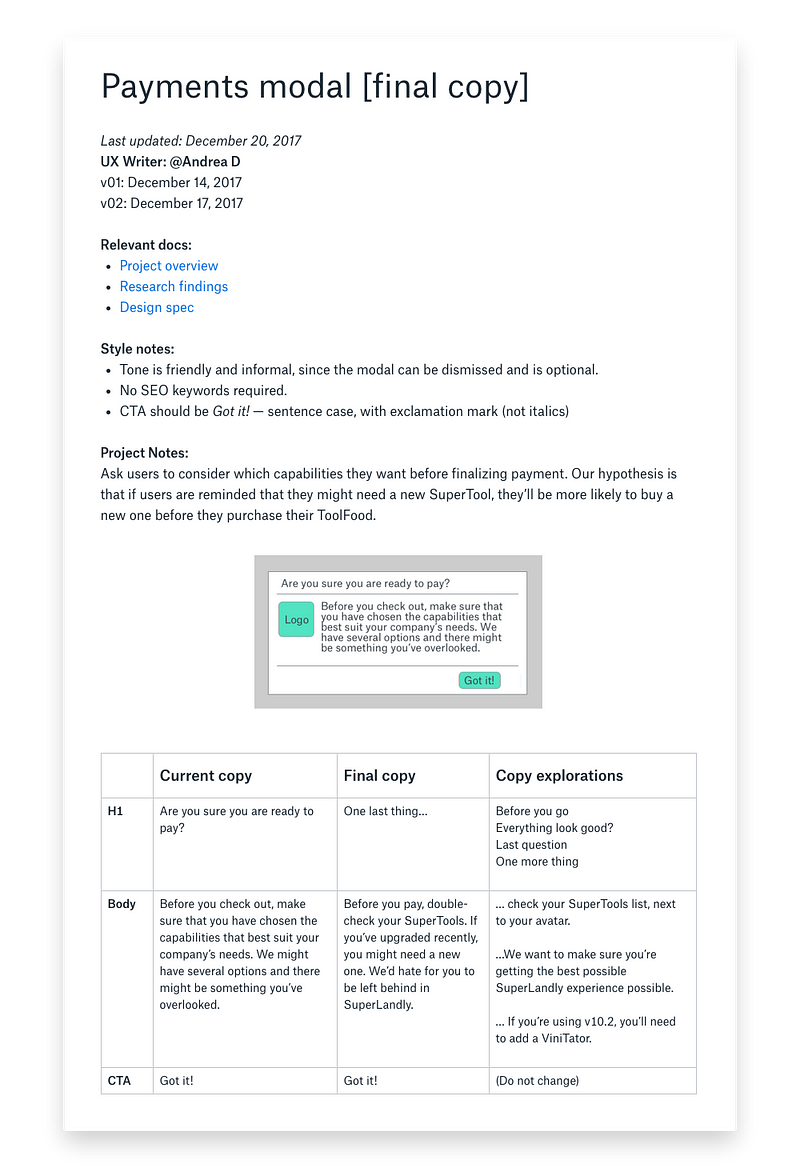
Example of a mock and copy table in a copy doc
How you decide on final copy is up to you and your team. For lighter projects, a fun way to decide is to vote on favorites with emoji. Assign everyone an emoji. Then have your team members place their emoji next to the copy variation they think works the best. If you’re emoji-averse, you can always use comments or initials to vote.

How you decide on final copy is up to you and your team. For lighter projects, a fun way to decide is to vote on favorites with emoji. Assign everyone an emoji. Then have your team members place their emoji next to the copy variation they think works the best. If you’re emoji-averse, you can always use comments or initials to vote.
Example of using emoji to vote 💙
Create a template for future copy docs
Once you have a copy doc format and process that works well for your team, consider creating a template for future copy docs. Find a copy doc that worked well for you, then copy and paste everything into a new doc. Delete the existing project images and copy. Save this as a template to fill in with future images and information.
When your next project comes down the pipeline, you’ll be a step ahead and ready to jump right into the creative process.
No comments:
Post a Comment